Reviewer: S. Randhawa, M.D., Allergist/Immunologist and Assistant Professor at NSU
Calibrate the device
The spirometry device should be calibrated with a 3-liter syringe every day the device is used. Three different volumes are used and a calibration log is kept on site. The calibration is done at the beginning of the day and is not repeated with each patient.
Prepare the software
Most office spirometers consist of a mouthpiece (with a disposable end) which connects to a desktop or laptop computer with a printer.
A simple spirometry system is provided by Occupational Health Dynamics/KoKo.
For KoKo systems, click "new patient."
Enter the patient data in the computer. Normal values are calculated based on age, gender, race and height. Weight is not used in most nomograms. A commonly used nomogram is Hanes III.
For KoKo systems, click "new test series." A set of pink dots will appear on the right side of the screen. Those pink dots represent the predicted values for a particular patient and a useful visual guide during the maneuver.
Explain the procedure to the patient, for example:
"You have to blow in as hard as you can initially and go on for 6 seconds. It is not easy to do and will try several of them. Then, we will pick the best 3 attempts. It will take about 5-10 minutes"
During the test
For KoKo systems, a press of the keyboard space bar activates the test. The bottom of the screen turns red ("prepare"), the then black and this is the time to start the test. A patient should be encouraged to achieve a rapid forceful expiration ("blast!") and to continue for at least 6 seconds (" go-go-go-go" or "keep going, keep going, keep going").
It helps to do a trial attempt initially so that a patient can get comfortable with the device and procedure.
The FVCs of different attempts have to be within 100 ml of each other to satisfy the reproducibility criteria.
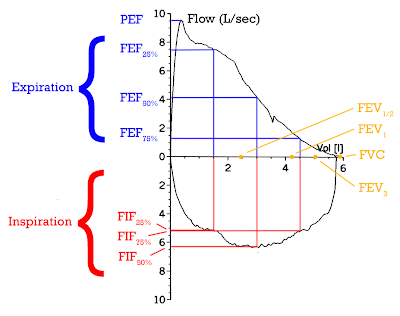
Flow-Volume loop showing successful FVC maneuver. Positive values represent expiration, negative values represent inspiration. The trace moves clockwise for expiration followed by inspiration. Note the FEV1, FEV1/2 and FEV3 values are arbitrary in this graph and just shown for illustrative purposes, they must be recorded as part of the experiment. Image source: Spirometry, from Wikipedia, the free encyclopedia, GNU Free Documentation License.
After the test
For KoKo systems, choose "save attempts" to complete the test, then print the results.
References
Spirometry Training Guide. National Institute for Occupational Safety and Health, CDC.
An Approach to Interpreting Spirometry. AFP, 2004.
When should a methacholine challenge be ordered for a patient with suspected asthma? (PDF file). CCJM, 01/2008.
APDIM E-Learning Task Force: Cardiac Auscultation, Chest X-Rays, Electrocardiograms, Patient Images (Dermatology), Pulmonary Function Tests, 2009.
Spirometry. Johns Hopkins University.
Spirometry in Primary Care. PowerPoint presentation.
OHD KoKo Spirometers.
Something Old, Something New: Spirometry and Exhaled Nitric Acid as Biomarkers of Airflow Obstruction http://goo.gl/xpX1x
Pulmonary Function Testing. Cleveland Clinic Disease Management Online Textbook.
Assessing Lung Function - a Must in Asthma Therapy http://bit.ly/HBWj7I
ERS Educational Videos of Medical Procedures http://buff.ly/1lz8ITD
Video
Assessing Lung Function - a Must in Asthma Therapy http://bit.ly/HBWj7I
ERS Educational Videos of Medical Procedures http://buff.ly/1lz8ITD
Video
No comments:
Post a Comment